- 「バッチファイルでリモートPCのスクリーンショットを撮りたい人」に向けた記事です。
- リモートデスクトップ接続が不要のため、ログイン中のユーザーをログアウトさせる事無く画面の保存ができます。
- 「PsExec」を利用した方法を紹介します。
PsExecについて簡単に紹介
「PsExec」はWindows OSにおけるリモートプログラムの実行ツールです。
マイクロソフトが提供している正規ツールになります。下記リンクからダウンロードできます。
結論
セッティング
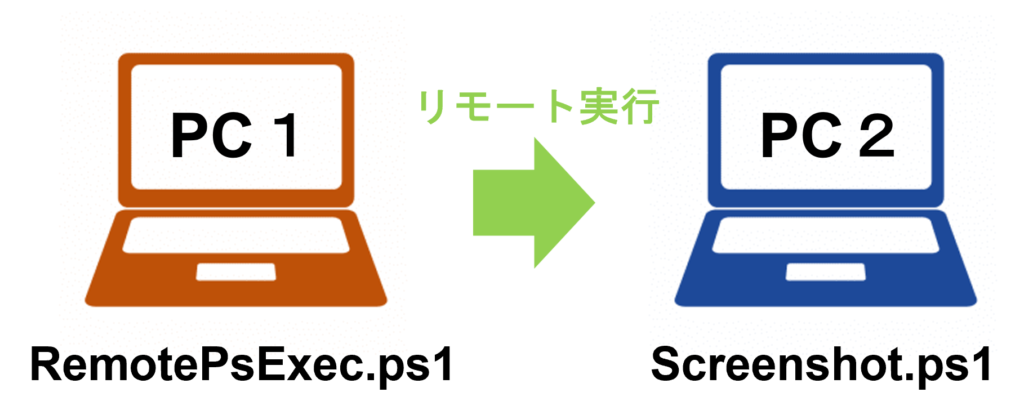
PsExecとPowerShellスクリプトを置く状況を図示しました。
- PC1:PsExecが入っているPC
-
PsExecはC:\PStools\PsExec.exeに置いてある。
PowerShellスクリプト「RemotePsExec.ps1」を実行すると、PC2のPowerShellスクリプトを実行できる。 - PC2:スクリーンショットを撮るPC
-
スクリーンショットを撮るPowerShellスクリプト「Screenshot.ps1」がC:\temp\に置いてある。
PC1:PsExecを使うpowershell スクリプト
$address = '[リモートPCのアドレス]'
$username = '[ユーザー名]'
$password = '[ログインパスワード]'
$results = psexec $address -u $username -p $password query session
$id = $results | Select-String "$username\s+(\w+)" | Foreach {$_.Matches[0].Groups[1].Value}

C:\PStools\PsExec.exe $address -u $username -p $password -i $id Powershell -Windowstyle Hidden -File "C:\temp\Screenshot.ps1"
PC2:スクリーンショットを撮るpowershell スクリプト
# screenshot-primary.ps1
# Modified From https://stackoverflow.com/questions/2969321/how-can-i-do-a-screen-capture-in-windows-powershell
Add-Type -AssemblyName System.Windows.Forms,System.Drawing

$screen = [Windows.Forms.Screen]::PrimaryScreen

$top    = $screen.Bounds.Top
$left   = $screen.Bounds.Left
$right  = $screen.Bounds.Right
$bottom = $screen.Bounds.Bottom

$bounds   = [Drawing.Rectangle]::FromLTRB($left, $top, $right, $bottom)
$bmp      = New-Object System.Drawing.Bitmap ([int]$bounds.width), ([int]$bounds.height)
$graphics = [Drawing.Graphics]::FromImage($bmp)

$graphics.CopyFromScreen($bounds.Location, [Drawing.Point]::Empty, $bounds.size)


$HHmmss = (Get-Date).ToString("HHmmss")
$yyyyMMdd = Get-Date -Format "yyyyMMdd"
$dir = "C:/temp"

if(Test-Path $dir/$yyyyMMdd){
    Write-Host "Directory already exists."
}
else{
    mkdir "$dir/$yyyyMMdd"
}

$bmp.Save("$dir/$yyyyMMdd/$HHmmss.bmp")

$graphics.Dispose()
$bmp.Dispose()- このスクリプトはStack Overflowのトピックを元に作成したものです。複数モニターへの対応などは下記のリンクを参考に改造できると思います。
- $dirのフォルダ(C:\temp)にyyyyMMddのフォルダを作成し、そこにHHmmss.bmpの名前でスクリーンショットを保存します。
- ふつうにデスクトップのスクリーンショットを撮るためにも使用できます。
◎参考リンク:PowerShellを用いたスクリーンショット

説明
PsExecの動作を確認するための簡単な例をいくつかあげます。
PsExecの動作確認:リモートアクセス
PsExecでリモートアクセスができるか確認する単純なスクリプトです。
ipconfigが実行され結果が表示されれば成功です。
$address = '[リモートPCのアドレス]'
$username = '[ユーザー名]'
$password = '[ログインパスワード]'
C:\PStools\PsExec.exe $address -u $username -p $password ipconfig
◎参考リンク:リモートに接続できない場合
PsExecの動作確認:バージョン2.32のバグ
バージョン2.32にはバグがあり、オプション-iを付けないと動作しません。
オプション-iを付けないと下記エラーが表示されます。
ログオン失敗:要求された種類のログオンは、このコンピューターではユーザーに許可されてません。-iを入れるだけで解決しますが、知らないとハマります。
$address = '[リモートPCのアドレス]'
$username = '[ユーザー名]'
$password = '[ログインパスワード]'
C:\PStools\PsExec.exe $address -u $username -p $password -i ipconfig
◎参考リンク:バージョン2.32のバグ

解説:セッションの紐づけについて
通常のリモート接続ではデスクトップは紐づいておらず、スクリーンショットの撮影やGUIアプリケーションの起動ができません。
これはセッションを指定することで解決します。調べ方としてPC2でコマンドプロンプトを開き
query userを実行すると、user一覧が見れます。こんな感じです。
| ユーザー名 | セッション名 | ID | 状態 |
| user | 1 | Active |
ActiveのsessionのIDを指定すればOKで、上記ならIDは1です。
notepadを起動させる下記スクリプトをPC1から試して下さい。
C:\PStools\PsExec.exe $address -u $username -p $password -i 1 -d notepad.exeさらに自動でActiveなsession IDが分かれば便利です。
Stack Overflowのトピックを参考にして、PC2でIDが取得できるか試してみましょう。
$address = '[リモートPCのアドレス]'
$username = '[ユーザー名]'
$password = '[ログインパスワード]'
$results = psexec $address -u $username -p $password query session
$id = $results | Select-String "$username\s+(\w+)" | Foreach {$_.Matches[0].Groups[1].Value}
$id
これらを組み合わせると、PC1から自動でsession IDを取得してnotepadを起動できます。
$address = '[リモートPCのアドレス]'
$username = '[ユーザー名]'
$password = '[ログインパスワード]'
$results = psexec $address -u $username -p $password query session
$id = $results | Select-String "$username\s+(\w+)" | Foreach {$_.Matches[0].Groups[1].Value}

C:\PStools\PsExec.exe $address -u $username -p $password -i $id -d notepad.exe
◎参考リンク:session IDの取得

補完情報:PowerShell実行時のウィンドウについて
Powershellは起動時に一瞬ウィンドウが表示されてしまいます。
これがどうしてもNGの場合は、他のアプリを経由することで回避できるとのことです。
◎参考リンク:PowerShellのウィンドウについて
まとめ
PsExecを用いてリモートPCのデスクトップのスクリーンショットを撮る方法を紹介しました。





コメント